
Three years have passed since I self-published my photo book, PERSONAL WORK. Thinking it might be time for the next book, I had been rereading the production documents.
I want to look back once more, in my own words. I will write about it step by step, from choosing the photos through printing and binding to getting the book to readers. I hope it offers something to anyone who wants to make a book of their own, or who simply loves books.

What got me started
I started taking photos in 2010. At first it was not work, just a personal hobby. Later, work started coming in, and I shifted toward commercial photography.
All that time I had a vague idea that I wanted to make a photo book, but I kept putting it off. When commercial work gets busy, my own projects tend to slip down the list.

What finally moved me to start was printing.
One day I turned on an Epson inkjet printer I had bought years earlier and left to gather dust, and printed a few of my favorite photos.
As I laid the prints side by side, I got into it: print that one too, put this one next to that one. I spread them across the floor at home.

For the next few days I rearranged them again and again and kept looking. As I did, I began to see what the book might be.
You cannot do this on a computer or a phone screen. Holding the prints, feeling the paper, I watched how the photos connected to one another.

“I want to make my own photo book and see it through to readers myself.” I wrote that and announced the project on social media in February 2023. I wanted to make it impossible to back out.
Choosing photos, cutting photos
I selected more than 500 photos as candidates. After more than ten years of shooting, I had many I was attached to.
I started laying out pages in Adobe InDesign. I am not a designer. This was the first time I used InDesign in earnest. Still, I decided to do the sequence and design myself, including the front and back covers.


As I worked, I noticed I lacked photos to connect one page to the next. If I lined up only the lead photos, the reader’s eye never had a place to rest.
A photo that stands on its own and a photo that moves the page forward are different. Photos that face each other across a spread, photos that come before and after, color, light, shadow, distance. I had to build the whole flow by watching those relationships.
This changed how I shoot afterward. Making a photo book was a way of gathering past photos, and at the same time it changed how I see the photos I have yet to take.
I narrowed those candidates down, and in the end included 148 photographs.

Contacting a printer
While I worked on the design, I contacted a printer I had been researching.
It was Fujiwara Printing, based in Matsumoto, Nagano. To be honest, I find sending email hard. A first contact, even more so. “Hello, my name is Takashi Yasui, a photographer based in Tokyo.” Even that opening line took me a while to write.
Fujiwara-san replied quickly. We set a meeting soon after and met for the first time at the company’s Tokyo branch. What was scheduled for about an hour ran close to two.

It was the first time in my life I had talked with someone seriously about photo books and printing. When I described what I had in mind, we moved straight to specifics. I had planned to get quotes from several companies, but by the end of that meeting I wanted to work with Fujiwara Printing.
When you self-publish a photo book, the work with the printer carries the whole book. With no publisher in between, there is no editor and no sales team. What kind of book it should be, how many copies to print, which paper to use, where to spend the budget. You have to decide all of it yourself.

That first meeting was already concrete. Trim size, paper, page count, number of photos, print run, schedule. Color proofing every photo. Attending the print run.
After a meeting that dense, I headed home in a daze. On the train I thought, I am really making a photo book, and it still felt unreal, like being inside a dream.

Deciding the specifications
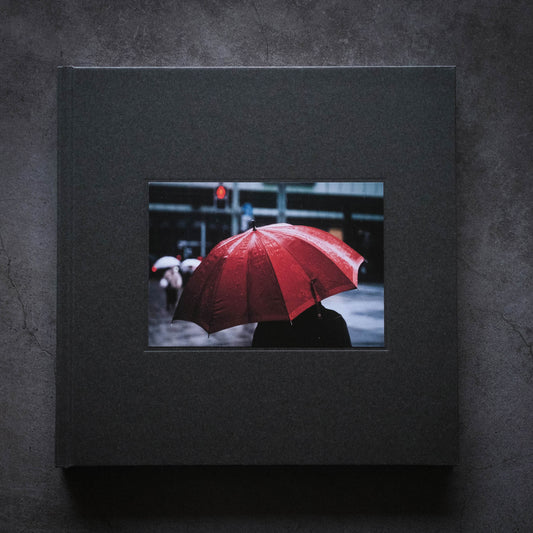
PERSONAL WORK ended up 210 × 210 mm, square. 192 pages. 148 photographs. Hardcover. For the body I chose OK Ultra Aqua Satin, and for the cover, NT Rasha.
The size came from a photo book I had picked up many times: Saul Leiter’s Early Color.

I chose the paper together with Fujiwara-san. OK Ultra Aqua Satin, the body paper, holds deep blacks well. It is bright, with a slight blue cast. My photos carry a lot of shadow. How the blacks would read on paper was a key point for this book.
A photo book is not made of photos alone. Paper, size, weight, how it opens, the feel of the cover. All of it shapes how a reader holds the book.
Holding the tsukamihon
Before printing, a tsukamihon was made. A tsukamihon, or dummy, is a sample built with the same paper and binding as the real book, but unprinted. There are no photos in it. Still, holding it, you feel the weight and thickness of the book you are about to make.

When I held the tsukamihon, the book suddenly became real to me. It was, without question, a book. At that stage I checked the thickness of the paper, how it opened, the feel of the cover.
Thicker paper is not better. Too thick, and the book is hard to open. The binding and the glue also change how the pages turn.
Imagining my photos printed on those blank pages, I felt an excitement I could not hold back.
Making color references
Next I needed color references. I printed all 148 photos on my inkjet printer at home.

These give the printer a target to match.
On screen, a digital photo is RGB. In print it becomes CMYK. A photo seen in the light of a monitor and a photo printed in ink on paper are not the same. And an inkjet print, home or professional, is different again from offset printing.
Even so, without a reference you cannot settle the color. What kind of black I wanted. I had to show the temperature and balance for each photo on paper.
I pushed these prints further than my earlier ones. The work was hard. Of the whole process, it may have been the hardest part.
When a photo did not come out right, I printed it again and again. In the end I printed far more sheets than the book holds. I had never run the printer this hard. The ink dropped fast.

When the ink ran out, I went to the electronics store for more. I had worked for hours in a room with the curtains drawn, to read color accurately, so when I stepped outside, the sunlight and outside air hit me all at once.
At the ramen shop where I stopped for lunch, I wanted to tell the stranger next to me, “I’m making a photo book right now.” I was in a strange state of mind.
The printing director’s work
In mid-May 2023, I traveled to Matsumoto, Nagano, for color proofing. About three hours from Shinjuku on the Azusa express. I looked out the window the whole way.

Color proofing means comparing a test print against the color reference and checking whether the color is right. There are several ways to do it. I chose a proof made on the same press and paper as the final run. Put simply, the most expensive method.

For a photo book, proofing every page on the actual press is rare, I’m told. Usually you check only the key pages and leave the rest to the printer. But I wanted to take responsibility for that too.
At the Matsumoto plant, we laid the proofs and the color references side by side and went through them. At the center of this was Hanaoka-san, the printing director at Fujiwara Printing.

I had not really understood what a printing director does. In making a photo book, that role is a big one. They understand the materials and the press, and set the direction for data correction and platemaking.
First, Hanaoka-san would look at a photo and tell me what he felt. Then I would tell him what I cared about in it. For this book, we talked about black and shadow over and over.
How to handle shadow was a major theme for this book. You cannot just make the black denser. Too dark, and the detail collapses. Too light, and the humidity and weight in my photos drain away.

Hanaoka-san was thinking about how far to push the shadow in platemaking and how much to adjust with ink on press. The first proof was intentionally left with room to spare. From there, we decided together how far to sink the black.
Moving a photo I had seen on screen onto paper took not only feeling but skill.

Deciding the cover and the title
For the cover I used a photo of a red umbrella. Rather than print across the whole cover, I chose a method called daisen-bari. A square recess is cut into the cover, and a separately printed photo is set into it. It looks like a framed photograph.

By then the title was set: PERSONAL WORK.
It is not a special phrase. It is closer to a plain noun. But it fit me. Personal work, nothing more. The plain words were enough.
On the spine I put black foil. The cover paper was matte, so fingerprints showed easily. To deal with that, we added a varnish.
The cover is the first thing you see when the book is closed. But not only that. The feel in your hand, the spine on a shelf, the sense of the book before you open it. All of that becomes part of the photo book.
For the cover proof, I checked the combinations: foil glossy or not, varnish or not. In the end I chose varnish, with matte foil. I wanted a restrained finish.

The press check
Two weeks after the proofing, I went back to Matsumoto. The proofing was done, and now the press check.
It ran two days. With Hanaoka-san, the printing director, and Uchiyama-san, the press operator, I checked the printing for every page.

At a press check, you start with a test print. You check it and adjust if needed. Once you sign off, the final run begins. Then you move to the next form and test again. For PERSONAL WORK, we checked 12 sheets, 24 sides.

The press was bigger than anything I had seen. Paper is drawn in, ink is laid down in the order K, C, M, Y, and the sheet comes out the far side.

Beside the press was a monitor showing the ink flow. Watching it, Uchiyama-san made fine adjustments to the ink. Even during the run he pulled finished sheets at intervals and checked for any drift in color.

For PERSONAL WORK, what counted was how the black was handled.
According to Hanaoka-san, each of the CMYK inks tops out at 100 percent, so 400 percent total is the densest black in printing. But the more ink you lay down, the more the shadow detail tends to collapse.

At the proof stage, the platemaking set the deepest shadows at 340 percent. On the final run we raised it to 370. Pushing the density this far is rare in ordinary work, I’m told. We could go that far only because I had chosen OK Ultra Aqua Satin.
Hearing this, I understood that choosing the paper and building the color are connected. The paper decides what you can and cannot do. How far you can sink the shadows. How much ink it can hold. Whether you can keep detail inside the black.

The black I was after could not be made from data alone. It came onto the page through the paper and the press, and through a person’s judgment.
At the press check, each time I finished checking, I wrote an OK.

Of course I could not judge all of it on my own. Without the printers’ skill, I could not have come this far. But in the end, deciding which way to go was mine.
On the evening of the second day, I signed off on the last sheet. The press check was over. The printed sheets go next to the bindery. From here, a stack of paper becomes a book.

To the bindery
Two weeks after the press check, I headed to Nagano for the third time, now to the bindery.
The body is gathered, joined with the cover, glued, and shaped into a book. Binding is split across specialist shops. For this book, Shibuya Bunsenkaku handled the gluing, and Dankseki the foil stamping and the inset label.
At Shibuya Bunsenkaku, I watched the body and cover being glued. The body on its own still looks unsteady. Joined with the cover and carried along the conveyor, it finally becomes a book.
 At Dankseki, I watched the foil stamping. The letters PERSONAL WORK rise on the spine the moment it passes through the machine. They showed me the die that gets reused for any reprint.

The last step was the inset label. Into the blind-stamped recess, the separately printed red-umbrella photo is applied one at a time. This was done by hand. After so many mechanized steps, at the end a person sets each photo in place. That stayed with me.

Watching the binding, you see that a photo book is also an industrial product.
For a photographer, a photo book is a body of work, a gathering of photographs. It is also an object made by cutting, folding, gathering, gluing, and wrapping paper. Many people’s labor is in it.
When I shoot, I think only about the photo. But with a photo book, there are steps that turn the photo into an object, and a specialist for each.
A photo book cannot be made by the photographer alone. Realizing that was a major experience for me.

Packing and shipping
To sell a photo book, you also need packing and shipping.
This too I had barely grasped before making the book. A photo book is heavy, so it can be damaged easily if it takes a hit. You also have to keep it from getting wet. Shipping one copy and shipping several call for different boxes.
In the end I used a frame-style box for single copies and a different one for multiples. I ordered samples, cushioning included, and checked them in hand.

Instead of shipping from home, I worked with a warehouse. When an order comes in, it connects to the fulfillment system and ships from the warehouse. Making a photo book does not end with making it. I had to think through where the books would be stored, and how orders would be taken and shipped.
Going on sale
In July 2023, after about half a year of work, I put the book on sale. What stays with me is the rhythm of how it sold. The first three months were intense. Because I had shared the process beforehand, about 1,000 copies sold.
I needed to sell 1,000 copies to recover the production cost. Reaching that point within three months was honestly a relief. What made me happiest was the purchase reports coming in from around the world on Instagram Stories.


Outside Japan, in order of volume, the book reached the United States, Taiwan, Singapore, the United Kingdom, China, France, Australia, and other places, 30 countries in all.
I still keep those purchase reports in my Instagram Stories highlights.
Since last year, there was a period when I could not ship to the United States because of tariffs, but shipping has now resumed.

Looking back
Making PERSONAL WORK was itself personal work, I think. It was also the experience of building the whole thing, from making a product to delivering it to readers.
What I like about self-publishing is that I decide everything myself, from selecting the photos to shipping.
The book still sells. Online only, with basically no promotions. I imagine buyers find the shop through my Instagram or my website, look at the production documents, and then buy.
With commercial publishing, a book that keeps selling slowly might be written off and pulped. And it is rarely reprinted. Anyone who loves photo books will know the sight of an “out of stock” notice.
With self-publishing, I can keep selling as long as I want. Three years on, orders still come in, and I like that rhythm: a sense that the book has reached someone without a conversation.

Even now, when so much information and so many exchanges have moved online, making a printed book and delivering it to someone still feels special.
That said, I have made only one book so far. To keep my work in physical form, I will keep making photo books.
PERSONAL WORK was built from photographs alone, so I also want to make a book of photographs and writing.
For the next one too, I will start by making prints.

If you would like to hold this book in your hands, it's 20% off for a limited time. Enter the code below at checkout on the shop.
Coupon: G0F7VNSA003E
(Photo credits: Takashi Yasui, Shuhei Inoue, and Nagisa Ichikawa)